一、pipeline语法介绍
Jenkins Pipeline 是一种插件,它允许你以代码的方式定义持续集成和持续交付(CI/CD)流程。它基于 Jenkins 的 Groovy DSL(领域特定语言),提供了一种强大的方式来描述和自动化构建、测试和
部署软件。
DSL 是什么?
DSL 其实是 Domain Specific Language 的缩写,中文翻译为领域特定语言(下简称 DSL);而
与 DSL 相对的就是 GPL,这里的 GPL 并不是我们知道的开源许可证,而是 General Purpose
Language 的简称,即通用编程语言,也就是我们非常熟悉的 Objective-C、Java、Python 以及
C 语言等等。
Pipeline 脚本可以被定义在 Jenkins 的界面中,也可以作为一个 Jenkinsfile 文件存在于代码仓库 中,以使流程定义与代码版本控制一起管理。以下是 Jenkins Pipeline 的基本概述:
1、阶段(Stages): Pipeline 由一个或多个阶段组成。每个阶段代表一个任务,例如构建、测试、 部署等。阶段通常按照顺序执行,可以并行执行或顺序执行。
2、步骤(Steps): 每个阶段包含一个或多个步骤。步骤是具体的操作,例如构建代码、运行测试、 推送到远程服务器等。Jenkins 提供了一系列内置步骤来完成常见的构建和部署任务,同时还可以使用自 定义步骤。3、代理(Agent): 代理定义了执行阶段的运行环境。它可以是 Jenkins 主节点(master)或一 个或多个远程节点(agent)。你可以指定阶段在特定的代理上执行,这使得你可以根据需要进行分布式 构建。
4、变量(Variables): 变量允许你在 Pipeline 中存储和操作数据。你可以定义全局变量,也可以 在阶段或步骤级别定义局部变量。变量可以用于保存构建号、版本号、环境配置等信息。
5、控制流(Control Flow): Pipeline 提供了条件、循环和错误处理等控制流语句,允许你根据不 同的条件执行不同的操作或重试失败的步骤。
结构示例
pipeline {agent anystages {steps {sh 'mvn clean package'}}steps {sh 'mvn test'}}steps {sh 'mvn deploy'}}}}释意
二、Jenkins pipeline入门
Pipeline 脚本是用 Groovy 语言编写的,但不需要专门学习 Groovy。Groovy 是一种基于 JVM 的敏捷开发语言,它结合了 Python、Ruby 和 Smalltalk 的特性,并且可以与 Java 代码很好地结合,也可以使用其他非 Java 语言编写的库。
Pipeline 支持两种语法:声明式和脚本式。
声明式语法是 Pipeline 的主要语法,它包括以下核心流程:1、pipeline: 声明 Pipeline 脚本的起始点,表明内容为声明式的 Pipeline 脚本。2、agent: 指定 Pipeline 运行的节点(可以是 slave 或 master 节点)。3、stages: 包含所有阶段的集合,例如打包、部署等。4、stage: 定义一个阶段,可以有多个阶段。5、steps: 定义每个阶段的最小执行单元。6、post: 定义构建后的操作,根据构建结果执行相应的操作。
示例
pipeline {agent anystages {steps {echo "I am liangxi"}}}post {always {echo "The process is ending"}}}在这个示例中:
可选项
1.Environment
environment 指令用于指定一系列键值对,这些键值对将作为环境变量定义在 Pipeline 的所有步骤或特定阶段的步骤中。具体取决于 environment 指令在 Pipeline 中的位置。示例
pipeline {agent anyenvironment {//设置环境变量CC = 'clang'}stages {stage('Example') {steps {//执行printenv命令查看所有的环境变量sh 'printenv'}}}}日志输出Started by user admin[Pipeline] Start of Pipeline[Pipeline] nodeRunning on Jenkins in /var/jenkins_home/workspace/test[Pipeline] {[Pipeline] withEnv[Pipeline] {[Pipeline] stage[Pipeline] { (Example)[Pipeline] sh+ printenvJENKINS_HOME=/var/jenkins_homeKUBERNETES_PORT=tcp://10.96.0.1:443KUBERNETES_SERVICE_PORT=443JENKINS_UC_EXPERIMENTAL=https://updates.jenkins.io/experimentalCI=trueRUN_CHANGES_DISPLAY_URL=http://192.168.1.100:30002/job/test/1/display/redirect?page=changesHOSTNAME=jenkins-849b5d5784-7wndcSHLVL=0NODE_LABELS=built-inHUDSON_URL=http://192.168.1.100:30002/HOME=/var/jenkins_homeBUILD_URL=http://192.168.1.100:30002/job/test/1/HUDSON_COOKIE=a7486a9f-f1a2-48a4-b7d5-99019f9e7028JENKINS_SERVER_COOKIE=durable-7190c2fadc48570bd1d6b9ff3df70884d6b72f619c1a447143f9aae059f70e9fJENKINS_UC=https://updates.jenkins.ioWORKSPACE=/var/jenkins_home/workspace/testREF=/usr/share/jenkins/refNODE_NAME=built-inRUN_ARTIFACTS_DISPLAY_URL=http://192.168.1.100:30002/job/test/1/display/redirect?page=artifactsSTAGE_NAME=ExampleEXECUTOR_NUMBER=1JENKINS_SERVICE_PORT_50000_TCP_ADDR=10.100.103.249RUN_TESTS_DISPLAY_URL=http://192.168.1.100:30002/job/test/1/display/redirect?page=testsBUILD_DISPLAY_NAME=#1JENKINS_VERSION=2.421KUBERNETES_PORT_443_TCP_ADDR=10.96.0.1JENKINS_INCREMENTALS_REPO_MIRROR=https://repo.jenkins-ci.org/incrementalsHUDSON_HOME=/var/jenkins_homeJOB_BASE_NAME=testPATH=/opt/java/openjdk/bin:/usr/local/sbin:/usr/local/bin:/usr/sbin:/usr/bin:/sbin:/binJENKINS_SERVICE_PORT_8080_TCP_ADDR=10.100.103.249JENKINS_SERVICE_SERVICE_HOST=10.100.103.249JENKINS_SERVICE_PORT_50000_TCP_PORT=50000BUILD_ID=1JENKINS_SERVICE_SERVICE_PORT_AGENT=50000KUBERNETES_PORT_443_TCP_PORT=443BUILD_TAG=jenkins-test-1JENKINS_SERVICE_PORT_50000_TCP_PROTO=tcpKUBERNETES_PORT_443_TCP_PROTO=tcpJENKINS_URL=http://192.168.1.100:30002/JENKINS_SERVICE_PORT_8080_TCP_PORT=8080LANG=C.UTF-8JOB_URL=http://192.168.1.100:30002/job/test/JENKINS_SERVICE_PORT_8080_TCP_PROTO=tcpBUILD_NUMBER=1JENKINS_NODE_COOKIE=ba947609-37ee-4863-869a-a0a0e83db1ffRUN_DISPLAY_URL=http://192.168.1.100:30002/job/test/1/display/redirectJENKINS_SERVICE_SERVICE_PORT=8080JENKINS_SERVICE_PORT=tcp://10.100.103.249:8080JENKINS_SLAVE_AGENT_PORT=50000HUDSON_SERVER_COOKIE=154a81c36d26db76JOB_DISPLAY_URL=http://192.168.1.100:30002/job/test/display/redirectJENKINS_SERVICE_PORT_50000_TCP=tcp://10.100.103.249:50000KUBERNETES_PORT_443_TCP=tcp://10.96.0.1:443KUBERNETES_SERVICE_PORT_HTTPS=443JOB_NAME=testCOPY_REFERENCE_FILE_LOG=/var/jenkins_home/copy_reference_file.logPWD=/var/jenkins_home/workspace/testJENKINS_SERVICE_PORT_8080_TCP=tcp://10.100.103.249:8080JENKINS_SERVICE_SERVICE_PORT_WEB=8080JAVA_HOME=/opt/java/openjdkKUBERNETES_SERVICE_HOST=10.96.0.1WORKSPACE_TMP=/var/jenkins_home/workspace/test@tmp设置的环境变量CC=clang[Pipeline] }[Pipeline] // stage[Pipeline] }[Pipeline] // withEnv[Pipeline] }[Pipeline] // node[Pipeline] End of PipelineFinished: SUCCESS
2.Options
options 指令用于设置 Pipeline 的行为,包括构建丢弃、并发执行、代码检出、超时、重试和时间戳等选项。备注:1、什么叫做代码检出?在 Jenkins Pipeline 中,代码检出是指从源代码版本控制系统(如 Git、Subversion 等)获取代码并将其放置到 Jenkins 代理节点上供后续构建步骤使用的过程。通常,在 Pipeline 的每个阶段之前,Jenkins 会自动执行默认的代码检出步骤,以确保在每个构建阶段开始之前,代码都是最新的。这样可以确保每个阶段都在相同的代码基础上运行。然而,有时候可能希望跳过默认的代码检出步骤,而是手动控制代码的获取。这在以下情况下可能有用:1)如果 Pipeline 中的某个阶段不需要访问代码库,例如只是执行一些不依赖于代码的操作。2)如果希望在 Pipeline 的某个特定阶段之前执行自定义的代码检出逻辑,例如从其他来源获取代码或切换到不同的代码分支。当使用 options { skipDefaultCheckout() }时,Pipeline 将跳过默认的代码检出步骤。这意味着在 Pipeline 的任何阶段中,需要自行编写代码检出逻辑,以便获取代码并将其放置在适当的位置供后续步骤使用。这样可以完全控制代码的获取方式和时机。请注意,如果使用了 skipDefaultCheckout(),则在 Pipeline 的任何阶段中,都需要显式地编写代码检出的步骤,否则可能会导致后续步骤无法正常执行,因为它们无法访问到代码。
可用选项
disableConcurrentBuilds:禁止并发执行 Pipeline,用于防止同时访问共享资源等场景。示例:options { disableConcurrentBuilds() }buildDiscarder:设置 Pipeline 保留的构建数量。可以使用 logRotator 插件配置日志轮换,指定要保留的最大构建数量。示例:options { buildDiscarder(logRotator(numToKeepStr: '1')) }skipDefaultCheckout:跳过默认设置的代码检出步骤。示例:options { skipDefaultCheckout() }:skipStagesAfterUnstable:一旦构建状态进入"Unstable"状态,就跳过之后的所有 stage。示例:options { skipStagesAfterUnstable() }:在 Jenkins 中,构建状态表示构建过程中的结果状态,常见的状态有"成功"(Success)、"失败"(Failure)和"不稳定"(Unstable)。"Unstable"状态表示构建完成,但存在一些非关键性的问题或警告。使用 options { skipStagesAfterUnstable() }配置后,当 Pipeline 的某个阶段将构建状态设置为"Unstable"时,Jenkins 将立即跳过该阶段之后的所有阶段,直接进入 Pipeline 的结束状态。这样可以提高构建过程的效率,避免在已知构建不稳定的情况下继续执行后续阶段。例如,假设有一个 Pipeline 包含三个阶段(stage):A、B 和 C。如果在阶段 B 中设置了一个条件,当某些非关键测试失败时将构建状态设置为"Unstable",那么使用 options { skipStagesAfterUnstable() }后,如果阶段 B 的构建状态为"Unstable",Jenkins 将跳过阶段 C,并直接结束 Pipeline 的执行。timeout:设置 Pipeline 运行的超时时间,超过超时时间,作业会被自动终止。可以指定时间和单位。示例:options { timeout(time: 1, unit: 'HOURS') }retry:在失败后,重试整个 Pipeline 的次数。可以指定重试次数。示例:options{ retry(3) }timestamps:在 Pipeline 生成的所有控制台输出中预定义时间戳。示例:options { timestamps() }:当你在 Pipeline 中执行一系列的步骤和命令时,Jenkins 会在控制台输出中显示每个步骤的执行结果和日志信息。这些输出通常以文本形式显示,其中每行代表一个输出条目。通过使用 options { timestamps() }配置,Jenkins 会在每个控制台输出的行前添加一个时间戳,以显示该行输出的时间。这样可以帮助你更好地追踪和分析 Pipeline 的执行过程,特别是在需要查找特定输出或分析日志的时间相关性时。
示例
pipeline {agent anyoptions{timestamps()}stages {steps {echo 'liangxi'}}}}日志输出Started by user adminRunning on Jenkins in /var/jenkins_home/workspace/test07:43:16 liangxiFinished: SUCCESS
3.parameters
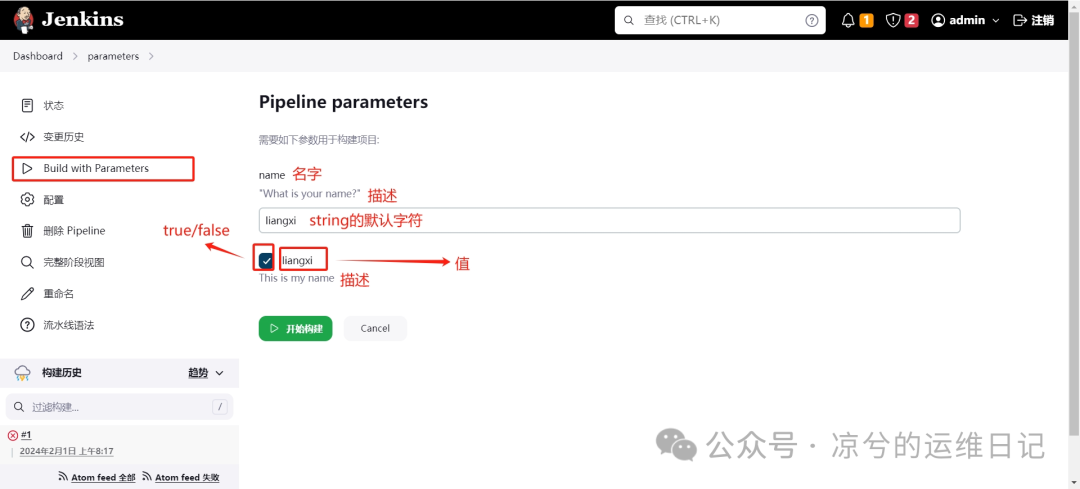
parameters 指令用于在 Jenkins Pipeline 中定义参数列表,这些参数允许用户在触发 Pipeline 时提供不同的值。参数值可以通过 params 对象在 Pipeline 的各个阶段中访问和使用。parameters 指令应该位于 Pipeline 的最外层,并且只能在 Pipeline 中出现一次。它定义了在触发 Pipeline 时用户可以提供的参数列表。参数定义的作用域是全局的,可以在整个 Pipeline 中使用。1、string 参数类型:用于定义字符串类型的参数。可以指定参数的名称、默认值和描述。例如:string(name: 'DEPLOY_ENV', defaultValue: 'staging', description: '')2、booleanParam 参数类型:用于定义布尔类型的参数。您可以指定参数的名称、默认值和描述。例如:booleanParam(name: 'DEBUG_BUILD', defaultValue: true, description: '')
示例
pipeline{agent anyparameters{string(name:'name',defaultValue:'liangxi',description:'"What is your name?"')booleanParam(name:'liangxi',defaultValue:true,description:'This is my name')}stages{stage("stage1"){steps{echo "$name"echo "$liangxi"}}}}
构建
第一次:
Started by user admin[Pipeline] Start of Pipeline[Pipeline] nodeRunning on Jenkins in /var/jenkins_home/workspace/parameters[Pipeline] {[Pipeline] stage[Pipeline] { (stage1)[Pipeline] }[Pipeline] // stage[Pipeline] }[Pipeline] // node[Pipeline] End of Pipeline//报错没有这样的属性或类Also: org.jenkinsci.plugins.workflow.actions.ErrorAction$ErrorId: 455f3d00-5cdd-4aef-944f-432240771accgroovy.lang.MissingPropertyException: No such property: name for class: groovy.lang.Bindingat groovy.lang.Binding.getVariable(Binding.java:63)at org.jenkinsci.plugins.scriptsecurity.sandbox.groovy.SandboxInterceptor.onGetProperty(SandboxInterceptor.java:285)at org.kohsuke.groovy.sandbox.impl.Checker$7.call(Checker.java:375)at org.kohsuke.groovy.sandbox.impl.Checker.checkedGetProperty(Checker.java:379)at org.kohsuke.groovy.sandbox.impl.Checker.checkedGetProperty(Checker.java:355)at org.kohsuke.groovy.sandbox.impl.Checker.checkedGetProperty(Checker.java:355)at com.cloudbees.groovy.cps.sandbox.SandboxInvoker.getProperty(SandboxInvoker.java:29)at org.jenkinsci.plugins.workflow.cps.LoggingInvoker.getProperty(LoggingInvoker.java:121)at com.cloudbees.groovy.cps.impl.PropertyAccessBlock.rawGet(PropertyAccessBlock.java:20)at WorkflowScript.run(WorkflowScript:10)at org.jenkinsci.plugins.pipeline.modeldefinition.ModelInterpreter.delegateAndExecute(ModelInterpreter.groovy:137)at org.jenkinsci.plugins.pipeline.modeldefinition.ModelInterpreter.executeSingleStage(ModelInterpreter.groovy:666)at org.jenkinsci.plugins.pipeline.modeldefinition.ModelInterpreter.catchRequiredContextForNode(ModelInterpreter.groovy:395)at org.jenkinsci.plugins.pipeline.modeldefinition.ModelInterpreter.catchRequiredContextForNode(ModelInterpreter.groovy:393)at org.jenkinsci.plugins.pipeline.modeldefinition.ModelInterpreter.executeSingleStage(ModelInterpreter.groovy:665)at org.jenkinsci.plugins.pipeline.modeldefinition.ModelInterpreter.evaluateStage(ModelInterpreter.groovy:288)at org.jenkinsci.plugins.pipeline.modeldefinition.ModelInterpreter.toolsBlock(ModelInterpreter.groovy:544)at org.jenkinsci.plugins.pipeline.modeldefinition.ModelInterpreter.toolsBlock(ModelInterpreter.groovy:543)at org.jenkinsci.plugins.pipeline.modeldefinition.ModelInterpreter.evaluateStage(ModelInterpreter.groovy:276)at org.jenkinsci.plugins.pipeline.modeldefinition.ModelInterpreter.withEnvBlock(ModelInterpreter.groovy:443)at org.jenkinsci.plugins.pipeline.modeldefinition.ModelInterpreter.withEnvBlock(ModelInterpreter.groovy:442)at org.jenkinsci.plugins.pipeline.modeldefinition.ModelInterpreter.evaluateStage(ModelInterpreter.groovy:275)at org.jenkinsci.plugins.pipeline.modeldefinition.ModelInterpreter.withCredentialsBlock(ModelInterpreter.groovy:481)at org.jenkinsci.plugins.pipeline.modeldefinition.ModelInterpreter.withCredentialsBlock(ModelInterpreter.groovy:480)at org.jenkinsci.plugins.pipeline.modeldefinition.ModelInterpreter.evaluateStage(ModelInterpreter.groovy:274)at org.jenkinsci.plugins.pipeline.modeldefinition.ModelInterpreter.inDeclarativeAgent(ModelInterpreter.groovy:586)at org.jenkinsci.plugins.pipeline.modeldefinition.ModelInterpreter.inDeclarativeAgent(ModelInterpreter.groovy:585)at org.jenkinsci.plugins.pipeline.modeldefinition.ModelInterpreter.evaluateStage(ModelInterpreter.groovy:272)at org.jenkinsci.plugins.pipeline.modeldefinition.ModelInterpreter.stageInput(ModelInterpreter.groovy:356)at org.jenkinsci.plugins.pipeline.modeldefinition.ModelInterpreter.stageInput(ModelInterpreter.groovy:355)at org.jenkinsci.plugins.pipeline.modeldefinition.ModelInterpreter.evaluateStage(ModelInterpreter.groovy:261)at org.jenkinsci.plugins.pipeline.modeldefinition.ModelInterpreter.inWrappers(ModelInterpreter.groovy:618)at org.jenkinsci.plugins.pipeline.modeldefinition.ModelInterpreter.inWrappers(ModelInterpreter.groovy:617)at org.jenkinsci.plugins.pipeline.modeldefinition.ModelInterpreter.evaluateStage(ModelInterpreter.groovy:259)at org.jenkinsci.plugins.pipeline.modeldefinition.ModelInterpreter.withEnvBlock(ModelInterpreter.groovy:443)at org.jenkinsci.plugins.pipeline.modeldefinition.ModelInterpreter.withEnvBlock(ModelInterpreter.groovy:442)at org.jenkinsci.plugins.pipeline.modeldefinition.ModelInterpreter.evaluateStage(ModelInterpreter.groovy:254)at ___cps.transform___(Native Method)at com.cloudbees.groovy.cps.impl.PropertyishBlock$ContinuationImpl.get(PropertyishBlock.java:73)at com.cloudbees.groovy.cps.LValueBlock$GetAdapter.receive(LValueBlock.java:30)at com.cloudbees.groovy.cps.impl.PropertyishBlock$ContinuationImpl.fixName(PropertyishBlock.java:65)at jdk.internal.reflect.GeneratedMethodAccessor358.invoke(Unknown Source)at java.base/jdk.internal.reflect.DelegatingMethodAccessorImpl.invoke(DelegatingMethodAccessorImpl.java:43)at java.base/java.lang.reflect.Method.invoke(Method.java:566)at com.cloudbees.groovy.cps.impl.ContinuationPtr$ContinuationImpl.receive(ContinuationPtr.java:72)at com.cloudbees.groovy.cps.impl.ConstantBlock.eval(ConstantBlock.java:21)at com.cloudbees.groovy.cps.Next.step(Next.java:83)at com.cloudbees.groovy.cps.Continuable$1.call(Continuable.java:152)at com.cloudbees.groovy.cps.Continuable$1.call(Continuable.java:146)at org.codehaus.groovy.runtime.GroovyCategorySupport$ThreadCategoryInfo.use(GroovyCategorySupport.java:136)at org.codehaus.groovy.runtime.GroovyCategorySupport.use(GroovyCategorySupport.java:275)at com.cloudbees.groovy.cps.Continuable.run0(Continuable.java:146)at org.jenkinsci.plugins.workflow.cps.SandboxContinuable.access$001(SandboxContinuable.java:18)at org.jenkinsci.plugins.workflow.cps.SandboxContinuable.run0(SandboxContinuable.java:51)at org.jenkinsci.plugins.workflow.cps.CpsThread.runNextChunk(CpsThread.java:187)at org.jenkinsci.plugins.workflow.cps.CpsThreadGroup.run(CpsThreadGroup.java:423)at org.jenkinsci.plugins.workflow.cps.CpsThreadGroup$2.call(CpsThreadGroup.java:331)at org.jenkinsci.plugins.workflow.cps.CpsThreadGroup$2.call(CpsThreadGroup.java:295)at org.jenkinsci.plugins.workflow.cps.CpsVmExecutorService$2.call(CpsVmExecutorService.java:97)at java.base/java.util.concurrent.FutureTask.run(FutureTask.java:264)at hudson.remoting.SingleLaneExecutorService$1.run(SingleLaneExecutorService.java:139)at jenkins.util.ContextResettingExecutorService$1.run(ContextResettingExecutorService.java:28)at jenkins.security.ImpersonatingExecutorService$1.run(ImpersonatingExecutorService.java:68)at jenkins.util.ErrorLoggingExecutorService.lambda$wrap$0(ErrorLoggingExecutorService.java:51)at java.base/java.util.concurrent.Executors$RunnableAdapter.call(Executors.java:515)at java.base/java.util.concurrent.FutureTask.run(FutureTask.java:264)at java.base/java.util.concurrent.ThreadPoolExecutor.runWorker(ThreadPoolExecutor.java:1128)at java.base/java.util.concurrent.ThreadPoolExecutor$Worker.run(ThreadPoolExecutor.java:628)at java.base/java.lang.Thread.run(Thread.java:829)Finished: FAILURE
第二次构建
日志输出
Started by user admin[[Running on Jenkins in /var/jenkins_home/workspace/parameters[[[[liangxi[true[[[[[Finished: SUCCESS
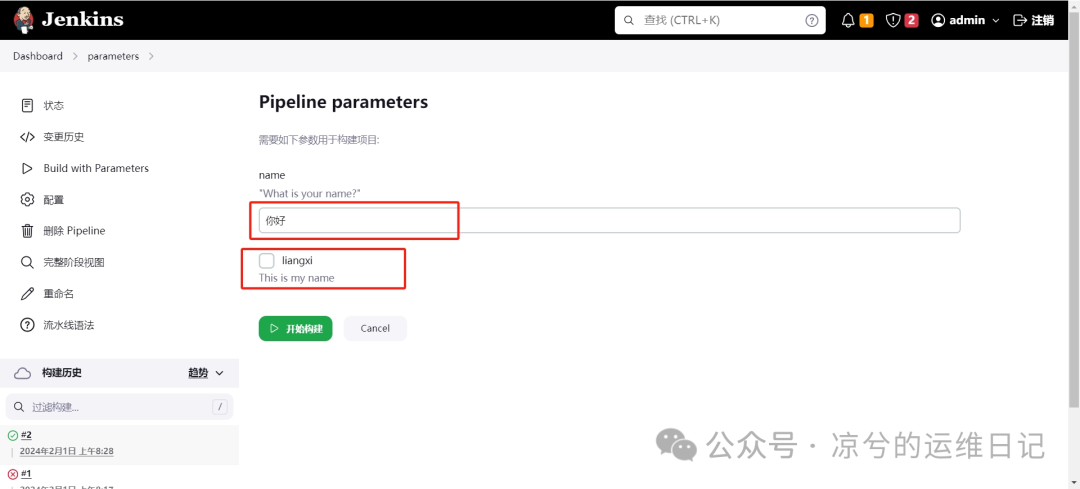
第三次自定义
日志输出
Started by user admin[[Running on Jenkins in /var/jenkins_home/workspace/parameters[[[[你好[false[[[[[Finished: SUCCESS
4.Triggers
triggers 指令定义了 Pipeline 自动化触发的方式。目前有三个可用的触发器:cron 和 pollSCM 和upstream作用域:被pipeline包裹,在符合条件下自动触发pipeline1、cron:接受一个 cron 风格的字符串来定义 Pipeline 触发的时间间隔,例如:triggers { cron('H 4/* 0 0 1-5') }cron 表达式的各个字段:H:代表 Hashed 值,用于避免多个任务同时触发。在每个小时内,相同的 H 值只会触发一个任务。这可以确保任务在指定的时间范围内只执行一次。4/*:表示分钟字段,指定每小时的第 4 分钟。0:表示小时字段,指定小时为 0 点。0:表示天字段,指定日期为任意日期。1-5:表示工作日字段,指定工作日为周一到周五。综上所述,该 cron 触发器的定义规则意味着在每个工作日的凌晨 0 点 4 分触发 Pipeline 的执行。这意味着 Pipeline 会在工作日的每个早晨 0 点 4 分执行一次。
5.input
stage 的 input 指令允许你使用 input step 提示输入。 在应用了 options 后,进入 stage 的agent 或评估 when 条件前,stage 将暂停。 如果 input 被批准, stage 将会继续。 作为 input 提交的一部分的任何参数都将在环境中用于其他 stage配置项messageidinput 的可选标识符, 默认为 stage 名称。oksubmittersubmitterParameterparameters提示提交者提供的一个可选的参数列表。
示例
pipeline {agent anystages {stage('Example') {input {message "Should we continue?"ok "Yes, we should."submitter "liangxi,lucky"parameters {string(name: 'PERSON', defaultValue: 'liangxi', description: 'Who should I say hello to?')}}steps {echo "Hello, ${PERSON}, nice to meet you."}}}}
过程
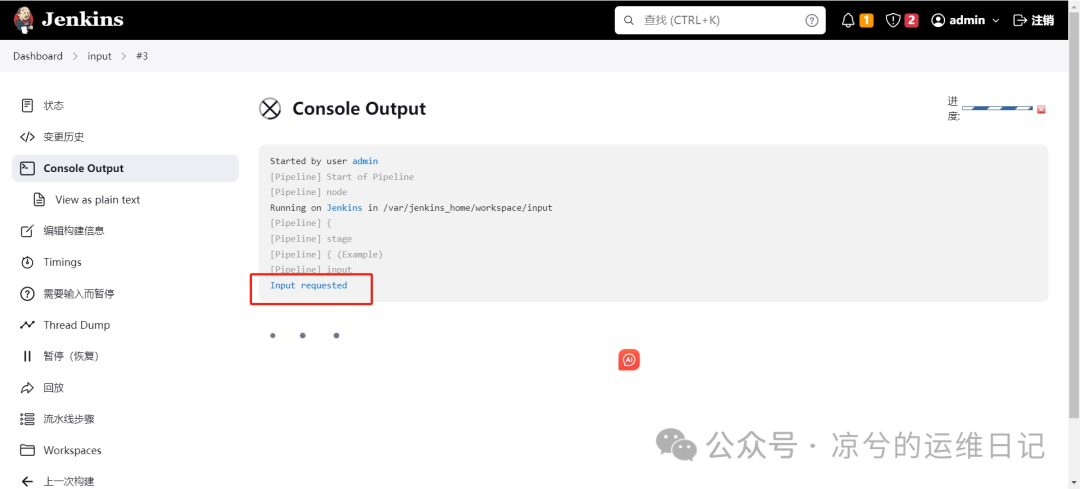
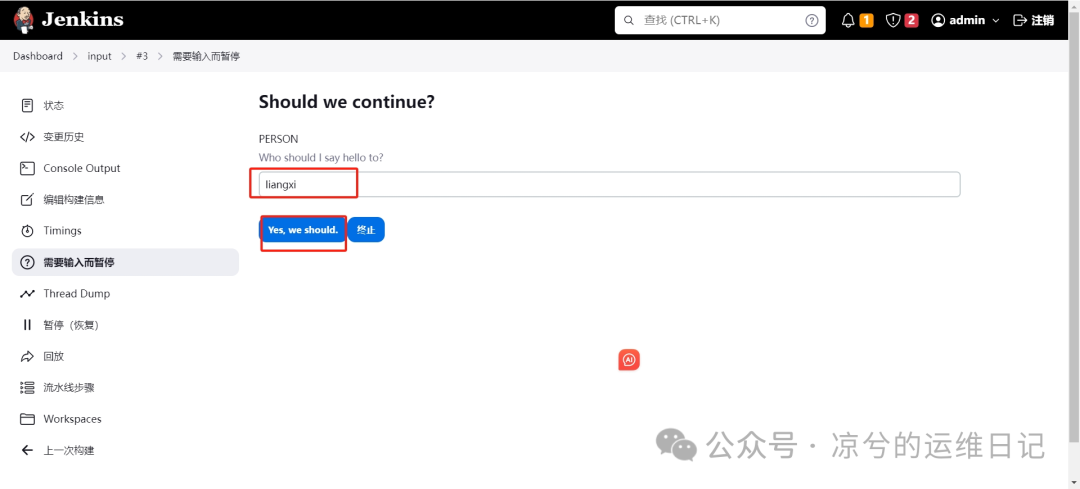
日志输出
Started by user admin[[Pipeline] nodeRunning on Jenkins in /var/jenkins_home/workspace/input[Pipeline] {[[[Input requestedApproved by admin[[[Hello, liangxi, nice to meet you.[[[[[[[Finished: SUCCESS
6.Parallel
Declarative Pipeline 近期新增了对并行嵌套 stage 的支持,对耗时长,相互不存在依赖的 stage可以使用此方式提升运行效率。除了 parallel stage,单个 parallel 里的多个 step 也可以使用并行的方式运行是否并行构建
示例
pipeline{agent anystages{stage('Non-parallel Stage'){steps{echo 'This stage will be executed first'}}stage('Parallel Stage'){when{branch 'master'}parallel{stage('branch A'){agent{label"for-branch-a"}steps{echo "On Branch A"}}stage('Branch B'){agent{label "for-branch-b"}steps{echo "On Branch B"}}}}}}
日志输出
Started by user admin[[Running on Jenkins in /var/jenkins_home/workspace/Parallel[[[[This stage will be executed first[[[[Stage "Parallel Stage" skipped due to when conditional[[[[[[[Stage "branch A" skipped due to when conditional[Stage "Branch B" skipped due to when conditional[[[[[[[[[[[Finished: SUCCESS
三、Pipeline Scripted语法
script Pipeline 提供了一组预定义的指令和块,使得构建、测试、部署等常见任务的编写变得更加容易。这种语法风格非常适合于简单到中等复杂度的流水线,并且可读性较高。它的主要优点是易于上手、易于理解和维护,并且具有一定的安全性,可以限制流水线的操作范围。选择 Declarative Pipeline 还是 Scripted Pipeline 取决于你的具体需求。如果你的流水线相对简单,且易于使用和理解,则 Declarative Pipeline 是一个不错的选择。如果你需要更高级的功能和更大的灵活性,或者需要与外部系统进行复杂的交互,则 Scripted Pipeline 可能更适合你的需求。
示例
node('testhan') { #testhan为以上设置的Pod模板标签stage('Clone') {echo "1.Clone Stage" #第一步克隆代码git url: "https://gitee.com/howehonkei/jenkins-sample" #gitee地址script {build_tag = sh(returnStdout: true, script: 'git rev-parse --short HEAD').trim()}}stage('Test') {echo "2.Test Stage" #打印2.Test Stage}stage('Build') { #构建镜像echo "3.Build Docker Image Stage"sh "docker build -t 192.168.1.130/jenkins-demo/jenkins-demo:${build_tag} ." #构建后的名字:仓库地址/项目名/镜像名:版本号}stage('Push') { #上传到镜像仓库echo "4.Push Docker Image Stage"withCredentials([usernamePassword(credentialsId: 'dockerharbor',passwordVariable: 'dockerHubPassword', usernameVariable: 'dockerHubUser')]) {sh "docker login 192.168.1.130 -u ${dockerHubUser} -p ${dockerHubPassword}"sh "docker push 192.168.1.130/jenkins-demo/jenkins-demo:${build_tag}"}}stage('Deploy to dev') {echo "5. Deploy DEV"sh "sed -i 's//${build_tag}/' k8s-dev-harbor.yaml "sh "kubectl apply -f k8s-dev-harbor.yaml --validate=false"}stage('Promote to qa') {def userInput = input(id: 'userInput',message: 'Promote to qa?', #是否部署到qatest测试环境parameters: [[$class: 'ChoiceParameterDefinition',choices: "YESnNO",name: 'Env']])echo "This is a deploy step to ${userInput}"if (userInput == "YES") { #如果是则部署,如果不是则exit退出sh "sed -i 's//${build_tag}/' k8s-qa-harbor.yaml "sh "kubectl apply -f k8s-qa-harbor.yaml --validate=false"sh "sleep 6"sh "kubectl get pods -n qatest"} else {//exit}}stage('Promote to pro') {def userInput = input(id: 'userInput',message: 'Promote to pro?', #是否部署到pro生产环境,如果是则部署,如果不是,则退出parameters: [[$class: 'ChoiceParameterDefinition',choices: "YESnNO",name: 'Env']])echo "This is a deploy step to ${userInput}"if (userInput == "YES") {sh "sed -i 's//${build_tag}/' k8s-prod-harbor.yaml "sh "kubectl apply -f k8s-prod-harbor.yaml --record --validate=false"}}}
将上面的pipeline变成声明式语法
pipeline{agent{node{label 'testhan'}}stages{stage('Clone'){steps{echo "1.Clone Stage"git url: "https://gitee.com/howehonkei/jenkins-sample"script{build_tag=sh(returnStdout: true, script: 'git rev-parse --short HEAD').trim())}}}stage('Test'){steps{echo "2.Test Stage"}}stage('Build'){steps{echo "3.Build Docker Image Stage"sh "docker build -t xuegod/jenkins-demo:${build_tag}"}}stage('Push'){steps{echo "4.Push Docker Image Stage"withCredentials([usernamePassword(credentialsId: 'dockerharbor',passwordVariable: 'dockerHubPassword', usernameVariable: 'dockerHubUser')]) {sh "docker login 192.168.1.130 -u ${dockerHubUser} -p ${dockerHubPassword}"sh "docker push 192.168.1.130/jenkins-demo/jenkins-demo:${build_tag}"}}}stage('Deploy to dev'){steps{echo "5. Deploy DEV"sh "sed -i 's//${build_tag}/' k8s-dev-harbor.yaml "sh "kubectl apply -f k8s-dev-harbor.yaml --validate=false"}}stage('Promote to qa') {steps{def userInput = input(id: 'userInput',message: 'Promote to qa?', #是否部署到qatest测试环境parameters: [choice(choices: "YESnNO"description: 'Select an option'name: 'ENV')])echo "This is a deploy step to ${userInput}"when {expression{userInput == 'YES'}}steps{sh "sed -i 's//${build_tag}/' k8s-qa-harbor.yaml "sh "kubectl apply -f k8s-qa-harbor.yaml --validate=false"sh "sleep 6"sh "kubectl get pods -n qatest"}}}stage("Promote to pro"){steps{def userInput = input(id: 'userInput',message: 'Promote to pro?', #是否部署到pro生产环境,如果是则部署,如果不是,则退出parameters: [choice(description: 'select an option'choices: "YESnNO",name: 'Env')])echo "This is a deploy step to ${userInput}"when{expression{userInput == 'YES'}}steps{sh "sed -i 's//${build_tag}/' k8s-prod-harbor.yaml "sh "kubectl apply -f k8s-prod-harbor.yaml --record --validate=false"}}}}}