放假不停歇,趁着假期学习下VUE3相关的内容,一方面是自己保持活力,另一方面也是工作需要,本系列是我的自学教程,如果有从0开始学习VUE3的,可以跟着一起练习下,毕竟前端我也是泥腿子出身,这一系列会使用Vite、TS、Pinia、Element-Plus等新知识点,既是查漏补缺,也是知识分享。
代码地址:
https://github.com/anjoy8/bcvp.vue3.git
这是每篇文章一节课一个分支,方便大家学习,会慢慢的将blog.admin项目进行翻新,使用的后端接口还是BlogCore。
系列文章:
本文参考的是开源项目
https://gitee.com/HalseySpicy/Geeker-Admin/tree/template
分步骤讲解登录逻辑,今天说一下获取动态菜单接口,为下一步动态渲染作准备。
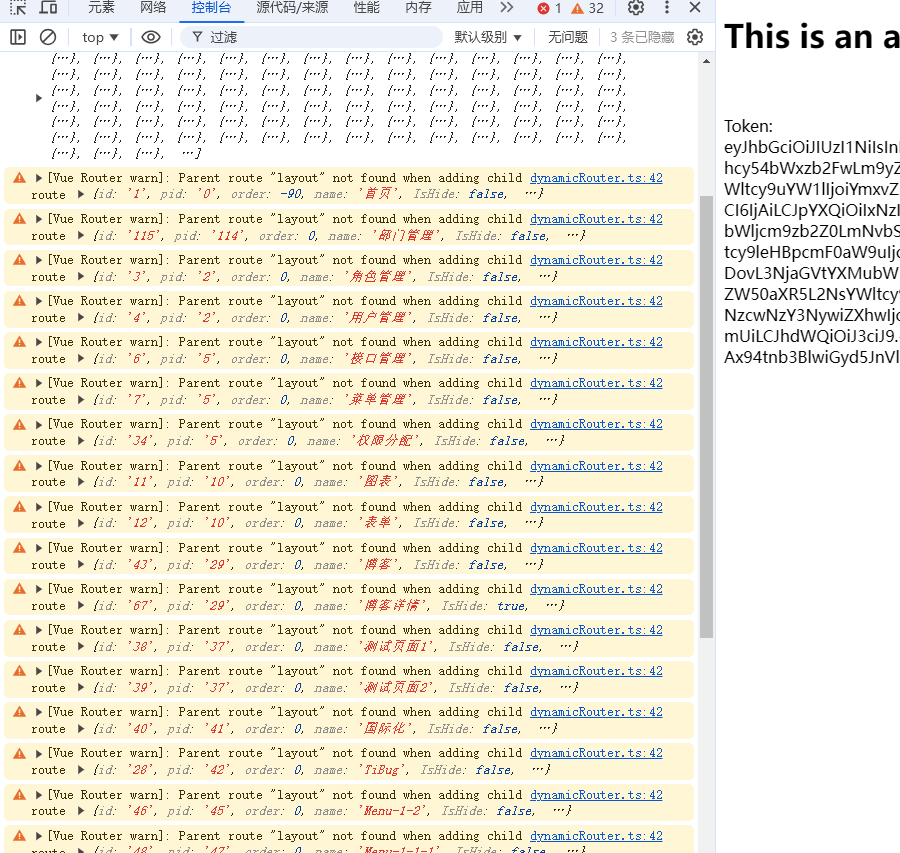
还是老规矩,定义一个接口模型,因为这个也是在全局都能用到的,还是定义一个全局,在typings下的global.d.ts文件中,定义相应的接口 然后,调用动态菜单数据接口, 在loginApi.ts文件中写逻辑,毕竟这个还算是登录模块的 因为菜单数据在很多地方都用的到,且大概率还是响应式的,所以还是放到Pinia里实现: 新建文件srcstoresmodulesauthMenu.ts 这里涉及到了一个公共模型,在stores/interfacse/index.ts中添加, 然后还需要一个util的帮助类,对接口返回的原始数据进行预处理,比如做一个过滤,或者数据扁平化处理,当然这块逻辑可以写到当前文件authMenu.ts中,不过抽离出来放到公共帮助类更好,其他地方肯定也能用到: 在src下建一个utils文件夹,新增一个index.ts文件 新建文件srcroutermodulesdynamicRouter.ts,增加内容: 主要就是封装一下菜单权限数据,根据当前人的ID,获取对应的菜单,进行逻辑处理,并交给状态管理器。 还是在登录逻辑里,登录完成后,获取用户信息后,根据用户id,进行初始化菜单路由数据动作: 重新登录,就能看到控制台打印的效果了,当然目前只有数据,还没有真正的和VUE进行页面数据绑定,和页面渲染,只不过数据已经准备好了, 下篇文章我们就真正的来到了VUE3+BlogCore的第一个重头戏——页面左侧菜单渲染,敬请期待。/* Menu */declare namespace Menu { interface MenuOptions { id: string; pid: string; order: number; name: string; IsHide: boolean; IsButton: boolean; path: string; Func: string | null; component?: string | (() => Promise); iconCls: string; meta: MetaProps; children?: MenuOptions[] | null; } interface MetaProps { title: string | null; requireAuth: boolean; NoTabPage: boolean; keepAlive: boolean; } export interface MenuRequest { uid: string; }}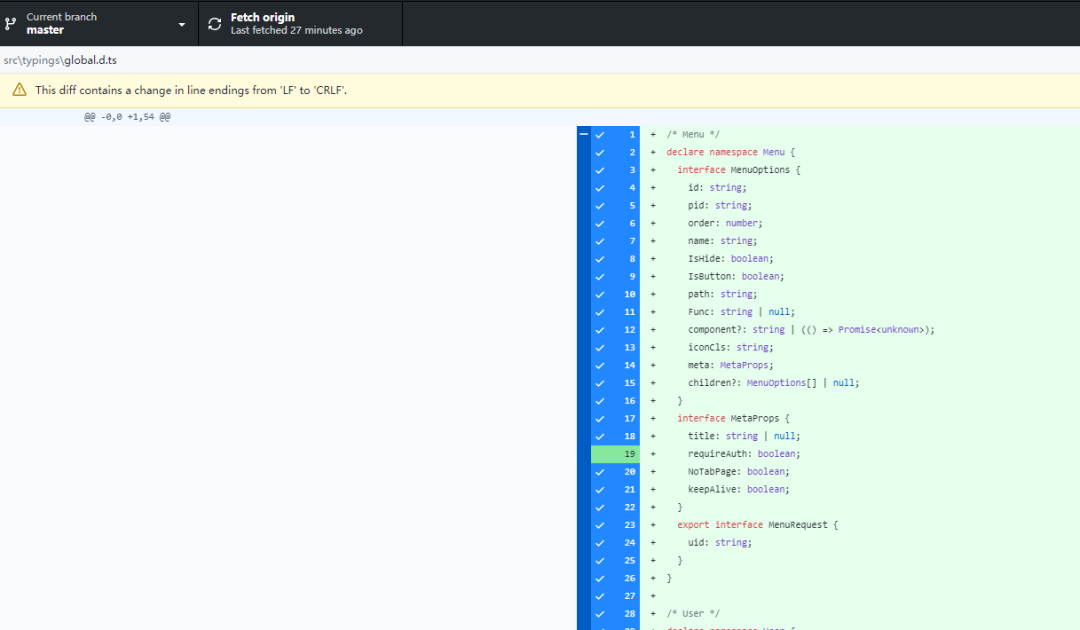
// 获取菜单列表export const getAuthMenuListApi = async (params: Menu.MenuRequest): Promise> => { try { const response = await get>('/api/permission/GetNavigationBar', { uid: params.uid, }); return response; } catch (error) { throw new Error('请求失败'); }};import { defineStore } from "pinia";import type { AuthState } from "@/stores/interface";import { getAuthMenuListApi } from "@/api/loginApi";import { getFlatMenuList, getShowMenuList, getAllBreadcrumbList } from "@/utils";export const useAuthMenuStore = defineStore({ id: "blogvue3-auth", state: (): AuthState => ({ // 按钮权限列表 authButtonList: {}, // 菜单权限列表 authMenuList: [], // 当前页面的 router name,用来做按钮权限筛选 routeName: "" }), getters: { // 按钮权限列表 authButtonListGet: state => state.authButtonList, // 菜单权限列表 ==> 这里的菜单没有经过任何处理 authMenuListGet: state => state.authMenuList, // 菜单权限列表 ==> 左侧菜单栏渲染,需要剔除 isHide == true showMenuListGet: state => getShowMenuList(state.authMenuList), // 菜单权限列表 ==> 扁平化之后的一维数组菜单,主要用来添加动态路由 flatMenuListGet: state => getFlatMenuList(state.authMenuList), // 递归处理后的所有面包屑导航列表 breadcrumbListGet: state => getAllBreadcrumbList(state.authMenuList) }, actions: { // Get AuthMenuList async getAuthMenuList(params: Menu.MenuRequest) { const { response } = await getAuthMenuListApi(params); this.authMenuList = response.children ?? []; }, // Set RouteName async setRouteName(name: string) { this.routeName = name; } }});/* AuthState */export interface AuthState { routeName: string; authButtonList: { [key: string]: string[]; }; authMenuList: Menu.MenuOptions[];}/** * @description 使用递归扁平化菜单,方便添加动态路由 * @param {Array} menuList 菜单列表 * @returns {Array} */export function getFlatMenuList(menuList: Menu.MenuOptions[]): Menu.MenuOptions[] { let newMenuList: Menu.MenuOptions[] = JSON.parse(JSON.stringify(menuList)); return newMenuList.flatMap(item => [item, ...(item.children ? getFlatMenuList(item.children) : [])]);}/** * @description 使用递归过滤出需要渲染在左侧菜单的列表 (需剔除 isHide == true 的菜单) * @param {Array} menuList 菜单列表 * @returns {Array} * */export function getShowMenuList(menuList: Menu.MenuOptions[]) { let newMenuList: Menu.MenuOptions[] = JSON.parse(JSON.stringify(menuList)); return newMenuList.filter(item => { item.children?.length && (item.children = getShowMenuList(item.children)); return !item.IsHide; });}/** * @description 使用递归找出所有面包屑存储到 pinia/vuex 中 * @param {Array} menuList 菜单列表 * @param {Array} parent 父级菜单 * @param {Object} result 处理后的结果 * @returns {Object} */export const getAllBreadcrumbList = (menuList: Menu.MenuOptions[], parent = [], result: { [key: string]: any } = {}) => { for (const item of menuList) { result[item.path] = [...parent, item]; if (item.children) getAllBreadcrumbList(item.children, result[item.path], result); } return result;};/** * @description 使用递归处理路由菜单 path,生成一维数组 (第一版本地路由鉴权会用到,该函数暂未使用) * @param {Array} menuList 所有菜单列表 * @param {Array} menuPathArr 菜单地址的一维数组 ['**','**'] * @returns {Array} */export function getMenuListPath(menuList: Menu.MenuOptions[], menuPathArr: string[] = []): string[] { for (const item of menuList) { if (typeof item === "object" && item.path) menuPathArr.push(item.path); if (item.children?.length) getMenuListPath(item.children, menuPathArr); } return menuPathArr;}/** * @description 递归查询当前 path 所对应的菜单对象 (该函数暂未使用) * @param {Array} menuList 菜单列表 * @param {String} path 当前访问地址 * @returns {Object | null} */export function findMenuByPath(menuList: Menu.MenuOptions[], path: string): Menu.MenuOptions | null { for (const item of menuList) { if (item.path === path) return item; if (item.children) { const res = findMenuByPath(item.children, path); if (res) return res; } } return null;}import router from "@/router/index";import type { RouteRecordRaw } from "vue-router";import { ElNotification } from "element-plus";import { useAuthStore } from "@/stores/auth";import { useAuthMenuStore } from "@/stores/modules/authMenu";// 引入 views 文件夹下所有 vue 文件const modules = import.meta.glob("@/views/**/*.vue");/** * @description 初始化动态路由 */export const initDynamicRouter = async (params: Menu.MenuRequest) => { const userStore = useAuthStore(); const authStore = useAuthMenuStore(); try { // 1.获取菜单列表 && 按钮权限列表 await authStore.getAuthMenuList(params); // await authStore.getAuthButtonList(); // 2.判断当前用户有没有菜单权限 if (!authStore.authMenuListGet.length) { ElNotification({ title: "无权限访问", message: "当前账号无任何菜单权限,请联系系统管理员!", type: "warning", duration: 3000 }); userStore.setToken(""); router.replace("/login"); return Promise.reject("No permission"); } console.log(authStore.flatMenuListGet); // 3.添加动态路由 authStore.flatMenuListGet.forEach(item => { item.children && delete item.children; if (!item.IsButton && item.path && typeof item.path == "string" && item.path != ' ' && item.path != '-') { item.component = modules["/src/views" + item.path + ".vue"]; router.addRoute("layout", item as unknown as RouteRecordRaw); } }); } catch (error) { // 当按钮 || 菜单请求出错时,重定向到登陆页 userStore.setToken(""); router.replace("/login"); return Promise.reject(error); }};import { initDynamicRouter } from '@/router/modules/dynamicRouter';const menuReq: Menu.MenuRequest = { uid: userInfoRes.response.uID }; // 2.添加动态路由await initDynamicRouter(menuReq);