1、软件包下载
nginx官网下载地址:https://nginx.org/en/download.html
2、安装编译依赖环境
1、安装编译环境
yum -y install gcc gcc-c++

2、安装pcre软件包(使nginx支持http rewrite模块)
yum install -y pcre pcre-devel gd-devel

3、安装openssl-devel(使nginx支持ssl)
yum install -y openssl openssl-devel

4、安装zlib
yum install -y zlib zlib-devel


一键安装依赖:
yum -y install gcc gcc-c++
pcre pcre-devel gd-devel
openssl openssl-devel
zlib zlib-devel
3、安装nginx
# 获取安装包(生产环境一般不联网,需要先下载后上传)
[root@localhost ~]# wget https://nginx.org/download/nginx-1.26.2.tar.gz
[root@localhost ~]# mkdir /data
[root@localhost ~]# mv nginx-1.26.2.tar.gz /data/

# 解压安装包
[root@localhost ~]# cd /data/
[root@localhost data]# ll
总用量 1216
-rw-r--r--. 1 root root 1244789  8月 13 00:39 nginx-1.26.2.tar.gz
[root@localhost data]# tar -xvf nginx-1.26.2.tar.gz
[root@localhost data]# cd nginx-1.26.2/

# 编译安装,需要编译的模块根据实际情况选择
[root@localhost nginx-1.26.2]# ./configure --prefix=/data/nginx
--with-http_stub_status_module
--with-http_ssl_module
--with-pcre --with-stream
--with-stream_ssl_module
[root@localhost nginx-1.26.2]# make && make install

# 查看版本信息
/data/nginx/sbin/nginx -v查看nginx安装模块
/data/nginx/sbin/nginx -V
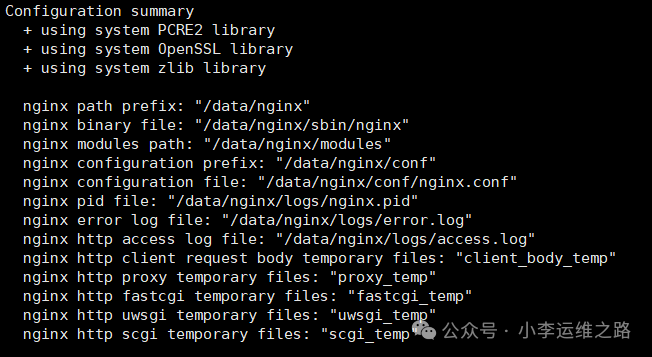
编译后各个文件的存在位置
4、将nginx做成服务
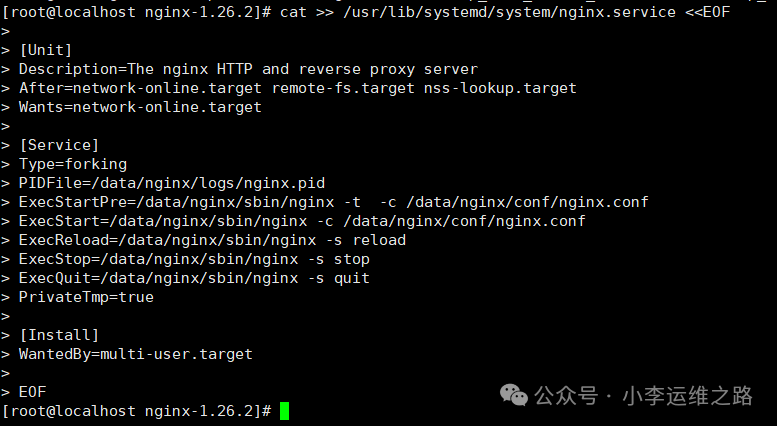
cat >> /usr/lib/systemd/system/nginx.service [Unit]
Description=The nginx HTTP and reverse proxy server
After=network-online.target
Wants=network-online.target

[Service]
Type=forking
PIDFile=/data/nginx/logs/nginx.pid
ExecStartPre=/data/nginx/sbin/nginx -t  -c /data/nginx/conf/nginx.conf
ExecStart=/data/nginx/sbin/nginx -c /data/nginx/conf/nginx.conf
ExecReload=/data/nginx/sbin/nginx -s reload
ExecStop=/data/nginx/sbin/nginx -s stop
ExecQuit=/data/nginx/sbin/nginx -s quit
PrivateTmp=true

[Install]
WantedBy=multi-user.target
EOF
5、启动Nginx服务
# 重载服务
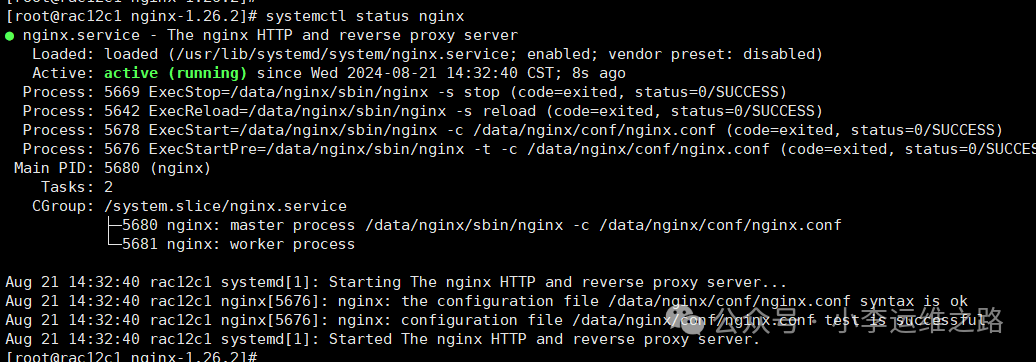
systemctl daemon-reload
# 启动并设置开机自启动
systemctl enable nginx --now
systemctl status nginx # 查看状态
# 查看端口信息(默认启动80端口)
netstat -lntup |grep 80
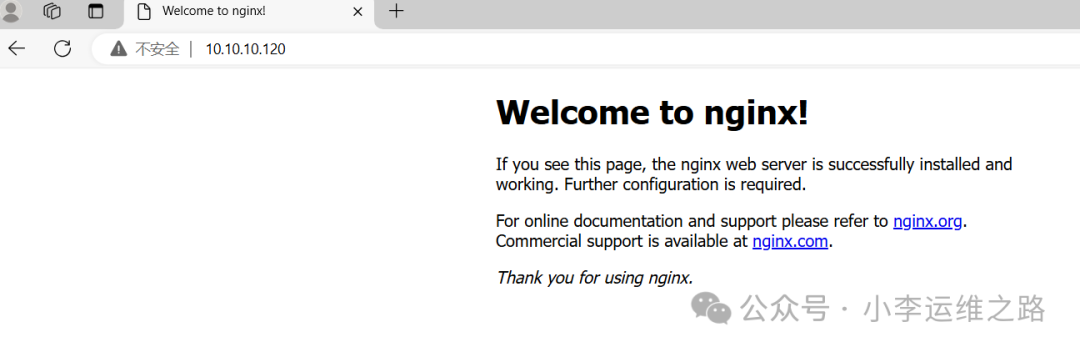
6、访问nginx页面
在浏览器上输入http:IP:端口
7、其他配置
# 添加环境变量
cat >> /etc/profile PATH=$PATH:/data/nginx/sbin
EOF
source /etc/profile

# 检查配置文件
nginx -t

# 重载nginx
systemctl reload nginx
nginx -s reload

# 停止nginx
systemctl stop nginx
nginx -s stop
编译参数说明
# 指定程序的安装目录
--prefix=/usr/local/nginx
# 指定配置文件路径,不指定则默认生成
--conf-path=/etc/nginx/nginx.conf
# 指定访问日志,不指定则默认生成
--http-log-path=/var/log/nginx/access.log
# 指定错误日志,不指定则默认生成
--error-log-path=/var/log/nginx/error.log
# 指定lock文件
--lock-path=/var/lock/nginx.lock
# 指定pid文件
--pid-path=/run/nginx.pid
# 设定http客户端请求临时文件路径
--http-client-body-temp-path=/var/lib/nginx/body
# 设定http fastcgi 模块文件路径
# 用于转发 PHP 编写的 web 应用程序的请求(动态网站)
--http-fastcgi-temp-path=/var/lib/nginx/fastcgi
# 设定http代理临时文件路径
--http-proxy-temp-path=/var/lib/nginx/proxy
# 设定http scgi临时文件路径
--http-scgi-temp-path=/var/lib/nginx/scgi
# 设定 http uwsgi 模块的文件路径
# 用于转发 Python 编写的 web 应用程序的请求(动态网站)
--http-uwsgi-temp-path=/var/lib/nginx/uwsgi
# 启用debug日志
--with-debug
# 编译PCRE包含“just-in-time compilation”
--with-pcre-jit
# 启用ipv6支持
--with-ipv6
# 启用ssl支持
--with-http_ssl_module
# 获取nginx自上次启动以来的状态,用于监控
--with-http_stub_status_module
# 允许从请求标头更改客户端的IP地址值,默认为关
--with-http_realip_module
# 实现基于一个子请求的结果的客户端授权。
# 如果该子请求返回的2xx响应代码,所述接入是允许的。
# 如果它返回401或403中,访问被拒绝与相应的错误代码。
# 由子请求返回的任何其他响应代码被认为是一个错误。
--with-http_auth_request_module
# 作为一个输出过滤器,支持不完全缓冲,分部分响应请求
--with-http_addition_module
//在线实时压缩输出数据流
--with-http_gzip_static_module
# 传输JPEG/GIF/PNG 图片的一个过滤器)(默认为不启用。gd库要用到)
--with-http_image_filter_module
//SPDY可以缩短网页的加载时间
--with-http_spdy_module
# 允许用一些其他文本替换nginx响应中的一些文本
--with-http_sub_module
//过滤转换XML请求
--with-http_xslt_module
# 启用POP3/IMAP4/SMTP代理模块支持
--with-mail
# 启用ngx_mail_ssl_module支持启用外部模块支持
--with-mail_ssl_module
如果你觉得本文档对你有所帮助,请不吝点赞、在看,分享给身边更多的朋友。如果你有任何疑问或建议,欢迎在评论区留言交流。