放假不停歇,趁着假期学习下VUE3相关的内容,一方面是自己保持活力,另一方面也是工作需要,本系列是我的自学教程,如果有从0开始学习VUE3的,可以跟着一起练习下,毕竟前端我也是泥腿子出身,这一系列会使用Vite、TS、Pinia、Element-Plus等新知识点,既是查漏补缺,也是知识分享。
代码地址:
https://github.com/anjoy8/bcvp.vue3.git
这是每篇文章一节课一个分支,方便大家学习,会慢慢的将blog.admin项目进行翻新,使用的后端接口还是BlogCore。
系列文章:
本文参考的是开源项目
https://gitee.com/HalseySpicy/Geeker-Admin/tree/template
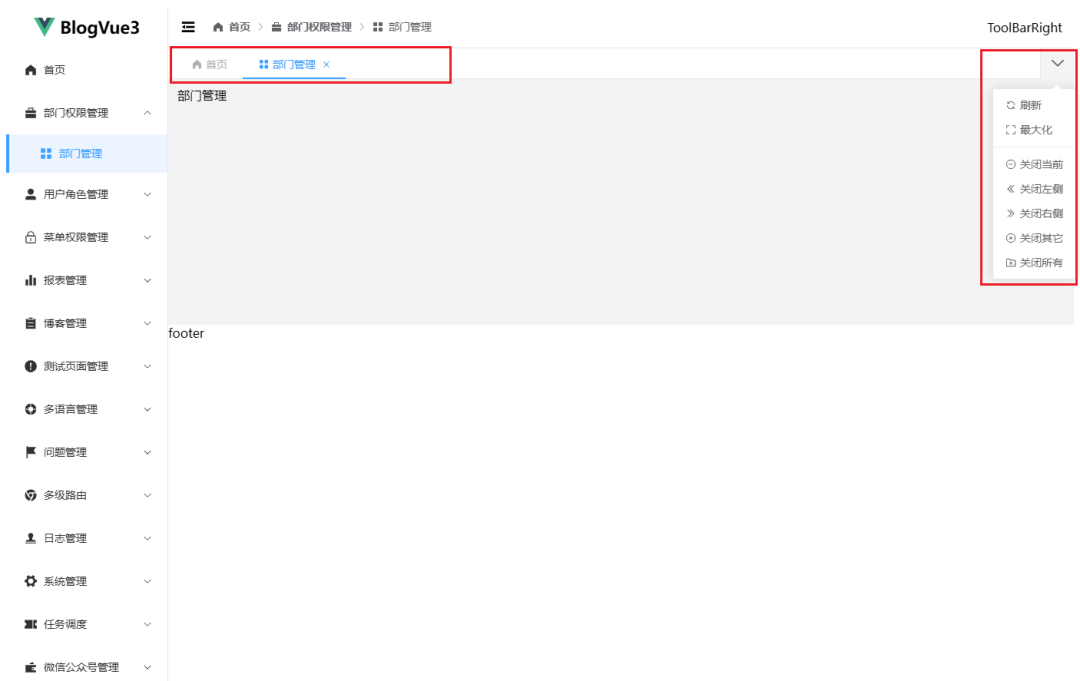
分步骤讲解框架核心逻辑,今天的内容是:实现tabs标签栏功能,效果图:
还是老规矩,只要是对数据的管理和控制,就想到使用状态管理器Pinia来处理,新建文件srcstoresmodulestabs.ts
import router from "@/router";import { defineStore } from "pinia";import type { TabsState, TabsMenuProps } from "@/stores/interface";import { useKeepAliveStore } from "./keepAlive";const keepAliveStore = useKeepAliveStore();export const useTabsStore = defineStore({id: "blogvue3-tabs",state: (): TabsState => ({tabsMenuList: []}),actions: {// Add Tabsasync addTabs(tabItem: TabsMenuProps) {if (this.tabsMenuList.every(item => item.path !== tabItem.path)) {this.tabsMenuList.push(tabItem);}},// Remove Tabsasync removeTabs(tabPath: string, isCurrent: boolean = true) {const tabsMenuList = this.tabsMenuList;// 如果是删除当前路由if (isCurrent) {tabsMenuList.forEach((item, index) => {if (item.path !== tabPath) return;// 让页面自动加载前一个或者后一个路由页面const nextTab = tabsMenuList[index + 1] || tabsMenuList[index - 1];if (!nextTab) return;router.push(nextTab.path);});}// 数据清理this.tabsMenuList = tabsMenuList.filter(item => item.path !== tabPath);},// Close Tabs On Sideasync closeTabsOnSide(path: string, type: "left" | "right") {// 关闭左侧、右侧const currentIndex = this.tabsMenuList.findIndex(item => item.path === path);if (currentIndex !== -1) {const range = type === "left" ? [0, currentIndex] : [currentIndex + 1, this.tabsMenuList.length];this.tabsMenuList = this.tabsMenuList.filter((item, index) => {return index 0] || index >= range[1] || !item.close;});}keepAliveStore.setKeepAliveName(this.tabsMenuList.map(item => item.name));},// Close MultipleTabasync closeMultipleTab(tabsMenuValue?: string) {// 关闭其他this.tabsMenuList = this.tabsMenuList.filter(item => {return item.path === tabsMenuValue || !item.close;});keepAliveStore.setKeepAliveName(this.tabsMenuList.map(item => item.name));},// Set Tabsasync setTabs(tabsMenuList: TabsMenuProps[]) {this.tabsMenuList = tabsMenuList;},// Set Tabs Titleasync setTabsTitle(title: string) {const nowFullPath = location.hash.substring(1);this.tabsMenuList.forEach(item => {if (item.path == nowFullPath) item.title = title;});}},});
内容比较简单,应该都能看的懂,就是实现了对tabsMenuList的增删改查操作,借助Pinia可以很简单的实现数据管理和维护,同时也能实现响应式。
template>div class="tabs-box">div class="tabs-menu">el-tabs v-model="tabsMenuValue" type="card" @tab-click="tabClick" @tab-remove="tabRemove">el-tab-pane v-for="item in tabsMenuList" :key="item.path" :label="item.title" :name="item.path":closable="item.close">template #label>el-icon v-show="item.icon && tabsIcon" class="tabs-icon">component :is="item.icon">component>el-icon>{{ item.title }}template>el-tab-pane>el-tabs>MoreButton />div>div>template>script setup lang="ts">import { ref, computed, watch, onMounted } from "vue";import { useRoute, useRouter } from "vue-router";import { useGlobalStore } from "@/stores/modules/global";import { useTabsStore } from "@/stores/modules/tabs";import { useAuthMenuStore } from "@/stores/modules/authMenu";import { useKeepAliveStore } from "@/stores/modules/keepAlive";import type { TabsPaneContext, TabPaneName } from "element-plus";import MoreButton from "./components/MoreButton.vue";import type { TabsMenuProps } from "@/stores/interface";const route = useRoute();const router = useRouter();const tabStore = useTabsStore();const authStore = useAuthMenuStore();const globalStore = useGlobalStore();const keepAliveStore = useKeepAliveStore();const tabsMenuValue = ref(route.fullPath);const tabsMenuList = computed(() => tabStore.tabsMenuList);const tabsIcon = computed(() => globalStore.tabsIcon);onMounted(() => {// initTabs();});// 监听路由的变化(防止浏览器后退/前进不变化 tabsMenuValue)watch(() => route.fullPath,() => {if (route.meta.isFull) return;tabsMenuValue.value = route.fullPath;const tabsParams = {icon: route.meta.icon as string,title: route.meta.title as string,path: route.fullPath,name: route.name as string,close: route.path != '/'};tabStore.addTabs(tabsParams);route.meta.isKeepAlive && keepAliveStore.addKeepAliveName(route.name as string);},{ immediate: true });// 初始化需要固定的 tabsconst initTabs = () => {authStore.flatMenuListGet.forEach(item => {if (!item.IsButton) {const tabsParams = {icon: item.meta.icon,title: item.meta.title,path: item.path,name: item.name,close: route.path != '/' // 可以固定某些路由不被删除};tabStore.addTabs(tabsParams as TabsMenuProps);}});};// Tab Clickconst tabClick = (tabItem: TabsPaneContext) => {const fullPath = tabItem.props.name as string;router.push(fullPath);};// Remove Tabconst tabRemove = (fullPath: TabPaneName) => {const name = tabStore.tabsMenuList.filter(item => item.path == fullPath)[0].name || "";keepAliveStore.removeKeepAliveName(name);tabStore.removeTabs(fullPath as string, fullPath == route.fullPath);};script>style scoped lang="scss">@import "./index.scss";style>
可以看到,核心逻辑就是有一个watch监听,将数据给放到状态管理器Pinia中。
然后再来个更多操作的按钮组件,将标签的增删改查操作同样在Pinia中处理:
新建srclayoutscomponentsTabscomponentsMoreButton.vue,
template>el-dropdown trigger="click" :teleported="false">div class="more-button">i :class="'iconfont icon-xiala'">i>div>template #dropdown>el-dropdown-menu>el-dropdown-item @click="refresh">el-icon>Refresh />el-icon>刷新el-dropdown-item>el-dropdown-item @click="maximize">el-icon>FullScreen />el-icon>最大化el-dropdown-item>el-dropdown-item divided @click="closeCurrentTab">el-icon>Remove />el-icon>关闭当前el-dropdown-item>el-dropdown-item @click="tabStore.closeTabsOnSide(route.fullPath, 'left')">el-icon>DArrowLeft />el-icon>关闭左侧el-dropdown-item>el-dropdown-item @click="tabStore.closeTabsOnSide(route.fullPath, 'right')">el-icon>DArrowRight />el-icon>关闭右侧el-dropdown-item>el-dropdown-item @click="closeOtherTab">el-icon>CircleClose />el-icon>关闭其它el-dropdown-item>el-dropdown-item @click="closeAllTab">el-icon>FolderDelete />el-icon>关闭所有el-dropdown-item>el-dropdown-menu>template>el-dropdown>template>script setup lang="ts">import { inject, nextTick } from "vue";import { useTabsStore } from "@/stores/modules/tabs";import { useGlobalStore } from "@/stores/modules/global";import { useKeepAliveStore } from "@/stores/modules/keepAlive";import { useRoute, useRouter } from "vue-router";const route = useRoute();const router = useRouter();const tabStore = useTabsStore();const globalStore = useGlobalStore();const keepAliveStore = useKeepAliveStore();// refresh current pageconst refreshCurrentPage: Function = inject("refresh") as Function;const refresh = () => {setTimeout(() => {keepAliveStore.removeKeepAliveName(route.name as string);refreshCurrentPage(false);nextTick(() => {keepAliveStore.addKeepAliveName(route.name as string);refreshCurrentPage(true);});}, 0);};// maximize current pageconst maximize = () => {globalStore.setGlobalState("maximize", true);};// Close Currentconst closeCurrentTab = () => {if (route.path == '/') return;tabStore.removeTabs(route.fullPath);keepAliveStore.removeKeepAliveName(route.name as string);};// Close Otherconst closeOtherTab = () => {tabStore.closeMultipleTab(route.fullPath);};// Close Allconst closeAllTab = () => {tabStore.closeMultipleTab();router.push('/');};script>
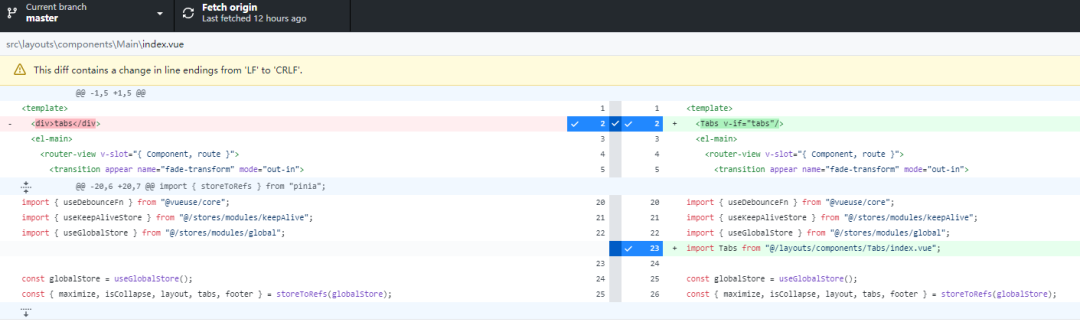
在文件srclayoutscomponentsMainindex.vue,增加内容:
这种组件封装还是比较简单的,通过Pinia也能实现响应式,不用太关心数据通讯,一劳永逸。
到了这里,其实已经开发完成了,不过会有一个问题,就是刷新页面的时候,之前点击后保存的数据会丢失掉,但是你可能好奇,为何左侧的菜单没有丢失,是因为每次刷新页面,就重新拉取了一次动态菜单的权限接口,又重新渲染了一次,所以左侧菜单就不受影响。
但是tabs标签栏不行,这数据本来就不是数据库控制的,所以就需要借助前端的持久化工具了——比如localstorage,传统的做法,在vue2的时候,就是用的vuex配合localstorage,实现数据的持久化,其实在第五课的时候,也是这么操作用户数据的,那有没有更简单的办法呢,答案是肯定的。
有一个Pinia的插件pinia-plugin-persistedstate,可以帮助我们很简单的将状态管理中的数据做持久化处理。
首先需要安装这个依赖,直接npm install即可,
然后新增src/stores/index.ts,使用这个插件:
import { createPinia } from "pinia";import piniaPluginPersistedstate from "pinia-plugin-persistedstate";// pinia persistconst pinia = createPinia();pinia.use(piniaPluginPersistedstate);export default pinia;
接下来对持久化方案进行配置,可以自定义存储位置,
新增srcstoresconfigpiniaPersist.ts:
import type { PersistedStateOptions } from "pinia-plugin-persistedstate";/*** @description pinia 持久化参数配置* @param {String} key 存储到持久化的 name* @param {Array} paths 需要持久化的 state name* @return persist* */const piniaPersistConfig = (key: string, paths?: string[]) => {const persist: PersistedStateOptions = {key,storage: localStorage,// storage: sessionStorage,paths};return persist;};export default piniaPersistConfig;
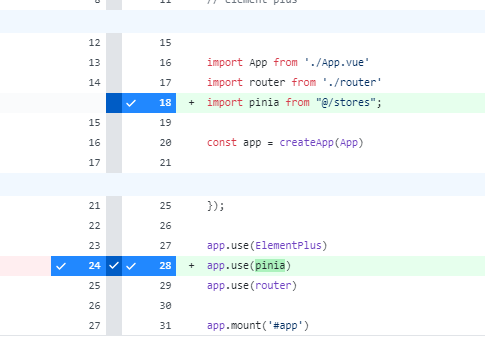
这里直接配置到localstorage中了,然后在main.ts主程序入口中,更新Pinia的注册方式:
最后在tabs.ts的标签状态管理中,引入这个配置:
import router from "@/router";import { defineStore } from "pinia";import piniaPersistConfig from "@/stores/config/piniaPersist";export const useTabsStore = defineStore({id: "blogvue3-tabs",state: (): TabsState => ({tabsMenuList: []}),actions: {// Add Tabs// .... 更多逻辑},persist: piniaPersistConfig("blogvue3-tabs")});
现在可以试试路由跳转和页面刷新都没问题
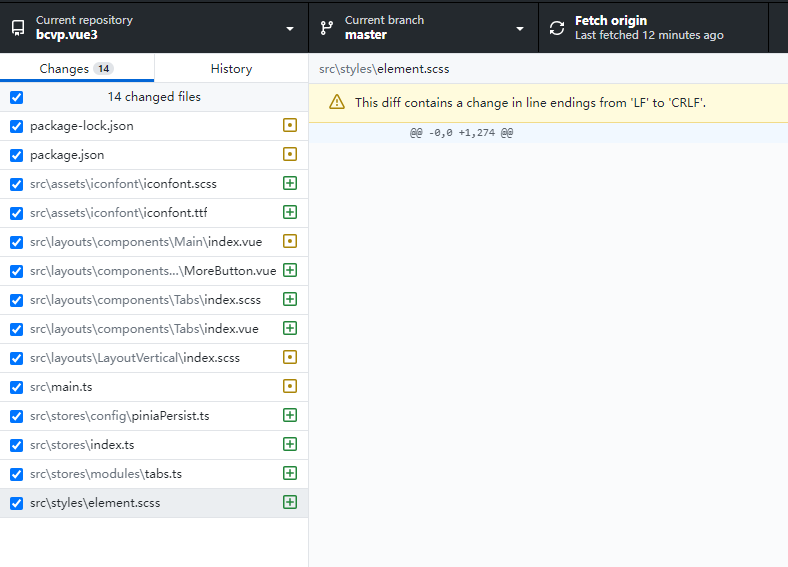
最后的最后,需要引用两个样式scss文件,分别是iconfont和element的。
本文全部的提交就如图:
下篇文章我们继续对页面优化,增加Header顶部右侧的功能ToolBar和个人信息配置,敬请期待。